

ADVERTISEMENT
Instructions
In a large mixing bowl, combine the warm water, granulated sugar, and active dry yeast. Stir gently and let it sit for 5-10 minutes, or until the mixture becomes foamy. This indicates that the yeast is active.
Add the all-purpose flour and fine sea salt to the yeast mixture. Pour in the 2 tablespoons of olive oil.
Using a wooden spoon or your hands, mix the ingredients until a shaggy dough forms.
Turn the dough out onto a lightly floured surface. Knead the dough for 8-10 minutes. The dough should become smooth, elastic, and no longer sticky. If it’s too sticky, add a tiny bit more flour, a teaspoon at a time. If it’s too dry, add a tiny bit more water.
Lightly grease a clean large bowl with a little olive oil. Place the kneaded dough into the bowl, turning it once to coat the entire surface with oil.
Cover the bowl with plastic wrap or a clean kitchen towel and place it in a warm, draft-free place for 1 to 1.5 hours, or until the dough has doubled in size.
Once the dough has risen, gently punch it down to release the air.
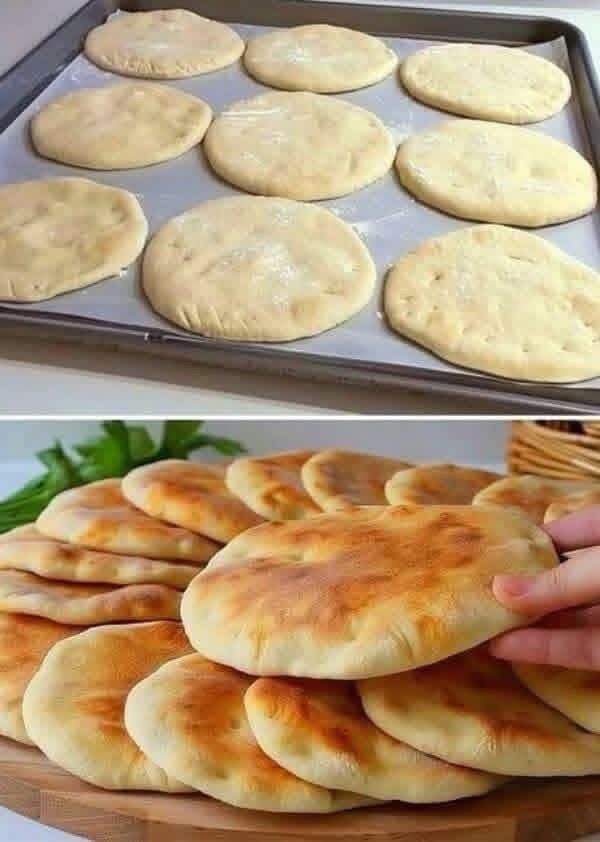
Turn the dough out onto a lightly floured surface and divide it into 6-8 equal pieces, depending on how large you want your flatbreads to be.
Roll each piece of dough into a smooth ball. Cover the dough balls with a clean kitchen towel and let them rest for another 10-15 minutes. This step helps relax the gluten, making the dough easier to roll.
Preheat your oven to 450°F (230°C). If you have a pizza stone or a heavy baking sheet, place it in the oven while it preheats to get it very hot. This will help create a crispier crust.
On a lightly floured surface, take one dough ball and use a rolling pin to roll it out into a thin, round, or oval shape, about 6-8 inches in diameter and about 1/8 to 1/4 inch thick. Try to roll it as evenly as possible to ensure uniform baking.
Carefully transfer the rolled flatbread to the preheated hot baking sheet or pizza stone. You might need to bake them in batches, depending on the size of your baking surface.
Bake for 4-7 minutes, or until the flatbread puffs up, turns golden brown in spots, and has a slightly crisp texture. The exact baking time will depend on your oven and the thickness of your flatbreads.
Once baked, immediately remove the flatbread from the oven. If desired, brush lightly with a little olive oil and sprinkle with a pinch of sea salt or fresh herbs.
Repeat the process with the remaining dough balls. As you bake them, stack the finished flatbreads and cover them with a clean kitchen towel to keep them warm and soft.
Serve the perfectly baked flatbreads warm and enjoy!
Cooking Tips and Variations
Achieving the perfect flatbread is a delightful endeavor, and a few key tips can make all the difference. For starters, the warmth of your water for activating the yeast is crucial; too hot and it kills the yeast, too cold and it won’t activate. Aim for bathwater temperature. When kneading, resist the urge to add too much flour, as this can make your flatbreads tough and dry. A slightly sticky dough is often a sign of good hydration. If you find your dough is sticking excessively, lightly flour your hands and work surface, but avoid incorporating large amounts of extra flour into the dough itself. The resting periods are equally important, allowing the gluten to relax and the yeast to work its magic, resulting in a more pliable dough that’s easier to roll and a more tender final product. Don’t rush these steps.
Preheating your baking surface, whether it’s a pizza stone or a heavy baking sheet, is a game-changer. A very hot surface mimics a tandoor oven, creating that immediate burst of heat that causes the flatbread to puff up beautifully and develop a lovely, slightly charred exterior. When rolling out the dough, aim for an even thickness. Unevenly rolled flatbreads will bake inconsistently, with some parts being crisp and others still doughy. If you’re struggling to get a perfectly round shape, don’t worry; rustic, free-form shapes are just as charming and delicious.
For variations, the possibilities are endless. To make a garlic herb flatbread, finely mince 2-3 cloves of garlic and chop 2 tablespoons of fresh rosemary or oregano. Mix these into the dough after the initial kneading, or sprinkle them on top with a drizzle of olive oil before baking. For a slightly richer flavor, you can substitute a portion of the water with milk or buttermilk. If you prefer a whole wheat option, replace up to half of the all-purpose flour with whole wheat flour, but be aware that you might need a little extra water as whole wheat flour absorbs more liquid. You can also experiment with different oils; avocado oil or grapeseed oil can offer a milder flavor profile compared to olive oil. For a touch of spice, a pinch of red pepper flakes can be incorporated into the dough or sprinkled on top. Consider adding a tablespoon of sesame seeds to the dough for a nutty flavor and texture. For a cheesy delight, sprinkle some grated Parmesan or mozzarella on top during the last minute of baking. The beauty of flatbreads lies in their adaptability, so feel free to get creative with your flavor additions!
ADVERTISEMENT
Storage and Reheating
Proper storage is key to maintaining the freshness and deliciousness of your homemade flatbreads. Once your flatbreads have cooled completely, stack them and wrap them tightly in aluminum foil, or place them in an airtight container or a resealable plastic bag. Stored at room temperature, they will remain fresh for 2-3 days. If you want to extend their shelf life, you can refrigerate them for up to a week. For longer storage, flatbreads freeze exceptionally well. Wrap individual flatbreads tightly in plastic wrap, then place them in a freezer-safe bag or container. They can be frozen for up to 3 months.
When it comes to reheating, you want to bring them back to their warm, tender state without making them tough or dry. If reheating from room temperature or the refrigerator, the best method is to use a dry skillet over medium heat. Place a flatbread directly in the skillet and heat for 1-2 minutes per side, or until warmed through and slightly pliable. You can also use a toaster oven or a regular oven. For an oven, preheat it to 350°F (175°C), sprinkle the flatbreads lightly with a few drops of water (this helps create steam and keeps them soft), and heat for 3-5 minutes, or until warm. If reheating from frozen, there’s no need to thaw. You can place the frozen flatbreads directly into a preheated oven at 350°F (175°C) for 5-8 minutes, or until soft and warm. Alternatively, you can use a dry skillet on medium-low heat, covering the skillet to trap some steam, and heat for 3-5 minutes per side. Avoid microwaving, as this tends to make flatbreads chewy and less appealing.
Frequently Asked Questions
Can I make this recipe without yeast?
Yes, you can make a yeast-free version of this flatbread. To do so, omit the yeast and sugar from the recipe. Instead, you can add 1 teaspoon of baking powder along with the flour, and potentially increase the olive oil by 1 tablespoon for tenderness. Mix the ingredients as directed, and after kneading, you won’t need the long rising time. You can let the dough rest for about 15-20 minutes after kneading before shaping and baking. The texture will be slightly denser and less airy than a yeast-leavened flatbread, but still delicious and quick.
What can I use if I don’t have a rolling pin?
No rolling pin? No problem! You can easily shape flatbreads using alternative tools. A clean, empty wine bottle or any sturdy, cylindrical bottle can work as a substitute. Simply lightly flour the bottle and use it as you would a rolling pin. Alternatively, you can use your hands to gently stretch and press the dough into your desired flat shape. This method might result in slightly thicker, more rustic flatbreads, but they will be equally delicious and have a unique charm. Just be patient and work the dough gently.
My flatbreads are coming out too stiff or dry. What went wrong?
There are a few common reasons why flatbreads might turn out stiff or dry. One possibility is that you added too much flour during the kneading or rolling process. Excess flour can make the dough less hydrated and therefore less tender. Another reason could be over-baking; flatbreads cook quickly, and even an extra minute or two in the oven can dry them out. Ensure your oven temperature is accurate and keep a close eye on them. Lastly, if your dough was not sufficiently hydrated to begin with (not enough water in the initial mix), the resulting flatbreads will lack tenderness. Next time, try adding a tiny bit more water to the dough if it feels very stiff during kneading, and reduce baking time slightly.
Can I prepare the dough ahead of time?
Absolutely! Preparing the dough ahead of time is a great way to make fresh flatbreads more convenient. After the first rise, you can punch down the dough, form it into a ball, and place it in a lightly oiled airtight container in the refrigerator. It will keep well for 1-2 days. When you’re ready to bake, take the dough out of the refrigerator about 30-60 minutes before you plan to roll it out, allowing it to come closer to room temperature. This will make it easier to work with. Then, proceed with dividing, resting, shaping, and baking as instructed.
ADVERTISEMENT